

How I did it... if you wonder
This is how I come up with my animation while studying at SJSU. I will discuss my procedure for tackling the dialogue and creature animation.
Dialogue
01 Sci-fi Dialogue Group Project
The team first finalized the dialogue and developed the backstories for Liam, a reckless lieutenant, and Sierra, a cautious sergeant. With the tone established, they filmed reference footage and planned the camera work, eventually choosing a wipe pan to support an overlapping voice line. We took notes on acting choices and poses to support the animation. Another teammate and I worked on creating the control‑room set with a holographic table and a window facing the destination planet while the rest of the team focused on editing and updating the 3D models.


As I moved into the animation phase, I began by blocking the characters’ key poses and establishing the overall timing. From there, I added in‑between poses to clarify actions, define arcs, and lay in the initial facial expressions and basic phoneme shapes.
In the spline stage, my focus shifted to refining the character’s COG, smoothing the motion path, and offsetting both translation and rotation controls. I repeated this process progressively up the body, chest, neck, head, shoulders, and hands while constantly checking weight shifts, leading actions, and natural offsets between body parts.
During polishing, I refined the hand arcs and staggered the finger movements so each finger led or followed appropriately during opens and closes. After that, I moved into the facial polish. The facial pass worked from top to bottom. I sharpened eyebrow actions and added overlapping motion, then refined the eye area with clearer blinks, eye darts, and subtle flesh movement for expressions like surprise or squinting. For the mouth, I established the jaw’s opening and closing, and slight asymmetry, then shaped the lips, especially the lower lip, to produce accurate phonemes such as b/p, f/v, oh, and u. I also added secondary details like mouth puffs and compression during squash and stretch. The nose was animated to track the mouth's vertical motion, and the cheeks were adjusted to reflect tension or relaxation. Final micro‑adjustments around the inner eye–nose area, outer cheeks, and brows helped unify the entire facial performance.
Throughout the process, I checked in often with my professor (big shoutout to Bryan Lind) to make sure the animation stayed on track. It was also an interesting experience. Due to the time limitation of animation for each animator, one of the teammates and I had to divide a shot and each animate one of the two characters in the same file, so we constantly communicated about who would animate when. We also kept an eye on overlapping actions to avoid any confusing moments in the shot, and made sure our characters interact properly in shared scenes. It was also interesting to test and learn to put together a hologram table.
Once all the animation was done, we pulled everything together—lighting, textures, the intro title, and the ending—and combined it into one final film. A big thanks to my groupmates: Nico Snow, Tristan Melewicz, and Sukiam Jason.


02 Individual Dialogue
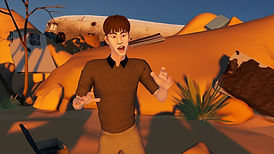
In another project with the wonderful professor Raquel Coelho, my dialogue clip was randomly selected. I began by listening to it repeatedly and brainstorming how I wanted the characters to behave. I took notes on the tone, mood, pauses, and emphasized words in the performance. From there, I sketched out possible settings and finalized with a scenario where an airplane has crashed in the middle of a desert, and three survivors are trying to plan their escape.
To help with the reference shoot, I also drafted potential character names, personalities, and backstories. My first round of reference wasn’t very successful. It was overacted because I was trying to push the performance too far for animation, so I had to simplify the actions and tone down the acting in the next pass.
During the layout stage, I focused on building the set. I gathered props and backgrounds—some from online references and many reused from previous class resources—and arranged everything into a cohesive environment. I aimed for a sunset look, using a tri‑lighting setup: the sun as the key light, the sky as the fill, and a warm yellow‑orange bounce for reflected light.
A big part of the process was troubleshooting shadows, since Maya’s default settings weren’t giving me the right look at the angle I needed. I also had to figure out how to hide the area lights that were showing up in the playblast. Once the lighting was sorted out, I brought the characters into the scene, placed them in their spots, and set up the camera for the final layout


Once the scene was ready, I blocked the characters’ golden poses, added breakdowns, and refined hand and facial expressions. I paid close attention to the first character’s arm openings and the woman’s gestures, simplifying both to make their performances feel more natural.
In spline, the flaws became clearer because some actions were too fast, and transitions felt jumpy. Therefore, I used parts of the dialogue as anticipation instead of relying on pauses. For instance, in the line “I have part of a plan,” I redistributed the action across “part” and “of the” to build anticipation for “plan,” reducing about 90% of the original movement from blocking.
During polishing, I worked from the COG upward, smoothing the chest, neck, head, and arms, and checking subtle hip shifts to keep the characters from being grounded in one spot. I refined the mid‑section with slight belly motion and cleaned up hand arcs and finger offsets, grouping certain fingers for more natural movement.
For facial polish, I first defined the holds for the eyebrows and eyes, then refined broader movements—adjusting inner and outer brows and adding slight eye‑socket shifts for asymmetry. I placed blinks on head turns or wide eye darts and used the darts themselves to show their personality and inner thoughts.
For the mouth, I established the jaw’s timing and added subtle Z‑rotation and X‑translation for drag. Then I shaped the lips for clear phonemes—compressing for b/p, hitting the teeth for f/v, and stretching for e and s—and animated the tongue for l, n, d, th sounds. I also added cheek puffs or compression for tension and b/p impacts.
Finally, I added small head nuances, especially for the woman’s longer line, using sharper head accents to express her frustration and ensuring each mouth shape read clearly with the audio.
Creature
01 Quadruped Animation
To understand how a four‑legged creature moves, I began by studying walk and run cycles. I gathered online references of cats and dogs, focusing mainly on their stride patterns. From there, I blocked in the key poses—setting the front legs in contact while the opposite legs moved into passing lift positions, and vice versa. I treated the pelvis and chest almost like two people walking with an offset, and a crucial detail was lifting the scapula to create that upward chest action rather than relying solely on the chest control.
After establishing the main beats, I posed the in‑betweens, paying close attention to the back legs and shaping that kicking motion that naturally drives the front legs forward. With the walk structure in place, I refined the belly, neck and head, and the tail to create a clear, continuous wave flowing through the body as the creature moves.
To make the walk cycle more engaging, I looked at the creature from multiple angles, especially the front and top view, to build the side‑to‑side weight shifts, a subtle contrapposto rotation, and an arched belly that favors one side of the body. From there, I polished the legs, curling the toes during the drag and spreading them outward on contact, which is most noticeable in the front feet. I also refined the tail, added overlap to the ears, and let the whiskers follow the head’s motion.
For the final touches, I ensured the walk looped cleanly. I added a small moment where the creature lifts its head and ears and blinks, as if noticing something in the distance, just enough to break the monotony of a plain cycle. I followed the same overall process for the run, but focused more heavily on posing to emphasize squash and stretch. Because the run cycle has tighter frame spacing, I used the foot placement to create the necessary offsets in spacing while still having both feet hit contact on the same frame.
To be continue...